

Typography
Typography
Section titled “Typography”Customize > Typography
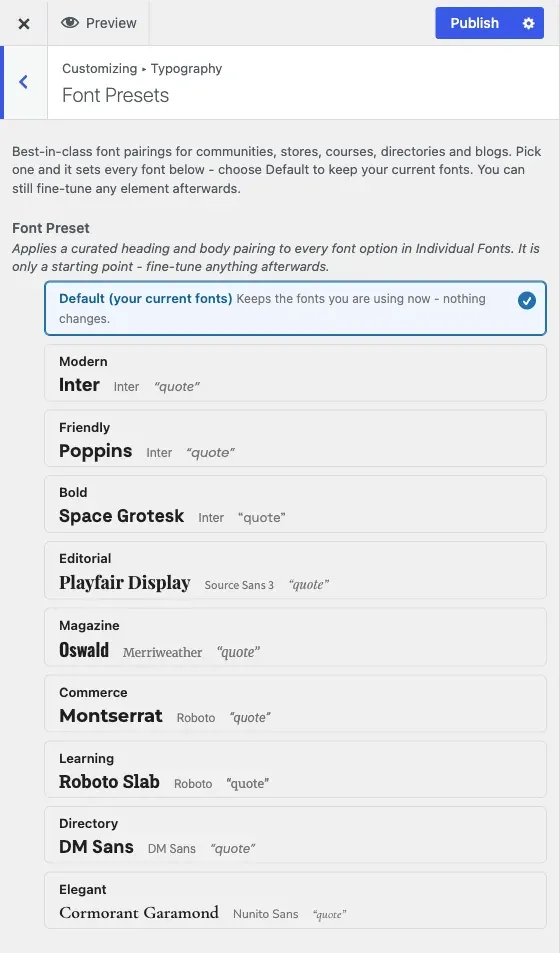
Typography has its own top-level panel with two sections: Font Presets, the recommended starting point, and Individual Fonts, for fine-tuning any element on its own.
Font Presets
Section titled “Font Presets”One picker, nine curated pairings plus a no-op Default. Each preset sets the body font, heading font, menu font and blockquote style together, so picking one is a single decision instead of setting fonts one element at a time. The presets are built for real use cases rather than being generic style names:
- Modern - Inter throughout. Multipurpose, SaaS, general community sites.
- Friendly - Poppins headings, Inter body. Approachable membership sites.
- Bold - Space Grotesk headings, uppercase menu. Startups and products.
- Editorial - Playfair Display headings, Source Sans 3 body. Blogs.
- Magazine - Oswald headings and uppercase menu, Merriweather body. News.
- Commerce - Montserrat headings, uppercase Montserrat menu, Roboto body. Stores.
- Learning - Roboto Slab headings, Roboto body. Courses and academic sites.
- Directory - DM Sans throughout. Listings and directories.
- Elegant - Cormorant Garamond headings, small-caps Nunito Sans menu. Portfolios.
Each option previews in its real typeface before you choose it. Picking a preset fills in every field in Individual Fonts below; anything you then change there wins over the preset, the same way an Individual Colors change wins over a palette.
Presets deliberately never set font size. Reign scales headings and body text responsively across desktop, tablet and phone in its own stylesheet, and a fixed pixel size from a preset would override that scale and break the mobile size. If you want a specific size for one element, set it by hand in Individual Fonts - the preset will not touch it.
Individual Fonts
Section titled “Individual Fonts”Fine-tune the font of any element on its own: family, weight, line height, letter spacing, transform and style, wherever the field offers them. The elements available are:
- Body Font
- Site Title
- Site Tagline
- Header Main Menu
- Header Sub Menu
- Heading 1
- Heading 2
- Heading 3
- Heading 4
- Heading 5
- Heading 6
- Blockquote Typography
Each heading has its own field, so you can give your page titles (Heading 1) a different look from the smaller section titles (Heading 4 to Heading 6). Most themes and editors use Heading 1 for the page title and Heading 2 to 6 for the headings inside your content.
Use this section either instead of a preset, for a fully custom look built one element at a time, or after a preset, to adjust the one or two elements that need something different from the pairing you picked. A preset fills these fields in; your own changes here always take priority afterward.
Use your own fonts
Section titled “Use your own fonts”You can use a font file you own, such as a brand font. Upload it to the WordPress Font Library first, then pick it in Reign.
- Go to Appearance > Fonts in your WordPress dashboard.
- Upload your font files. Each family you add becomes available to Reign.
- Open Customize > Typography > Individual Fonts.
- Open the element you want to change, such as Body Font or Heading 1.
- Open the Family list. Your uploads appear in a group called Custom Fonts, next to Theme fonts and Google Fonts. You can also search the list.
- Pick your font and publish.
Reign only reads your uploaded fonts. It never changes or deletes them, so manage them in Appearance > Fonts. Reign adds the font to your pages for you, so visitors see it without any extra setup. If Custom Fonts is missing from the list, no font has been uploaded yet.
Which one to use
Section titled “Which one to use”Start with Font Presets on every new site - it is one decision and gets you a coherent, tested pairing immediately. Only open Individual Fonts if a specific element genuinely needs to differ from the preset, the same rule that applies to color: broad setting first, narrow override only where it’s actually needed.