

Stripe Payments
Accept credit cards, debit cards, Apple Pay, and Google Pay on your marketplace using Stripe – the most popular online payment processor.
What You Need
Section titled “What You Need”- A free Stripe account at stripe.com
- An SSL certificate on your site (HTTPS)
- WP Sell Services with standalone mode enabled
Setting Up Stripe
Section titled “Setting Up Stripe”Sandbox vs Live Mode
Section titled “Sandbox vs Live Mode”Always start with Stripe’s Test Mode before processing real payments. Test mode uses separate API keys and never charges real cards.
| Test Mode | Live Mode | |
|---|---|---|
| API keys start with | pk_test_ / sk_test_ |
pk_live_ / sk_live_ |
| Real charges | No | Yes |
| Webhook events | Test events only | Real events |
| Dashboard URL | Same dashboard, toggle “Test mode” | Same dashboard |
To switch: Toggle “Test mode” in your Stripe Dashboard (top right), copy the new keys, and update them in WP Sell Services settings. Remember to update the webhook endpoint secret too – test and live webhooks have separate secrets.
Get Your API Keys
Section titled “Get Your API Keys”Stripe gives you two sets of keys – test keys for trying things out, and live keys for real payments.
- Log in to Stripe Dashboard
- Toggle Test mode (top right) to start with test keys
- Go to Developers > API keys
- Copy your Publishable key and Secret key
Test keys start with pk_test_ and sk_test_. Live keys start with pk_live_ and sk_live_.
Add Keys to Your Site
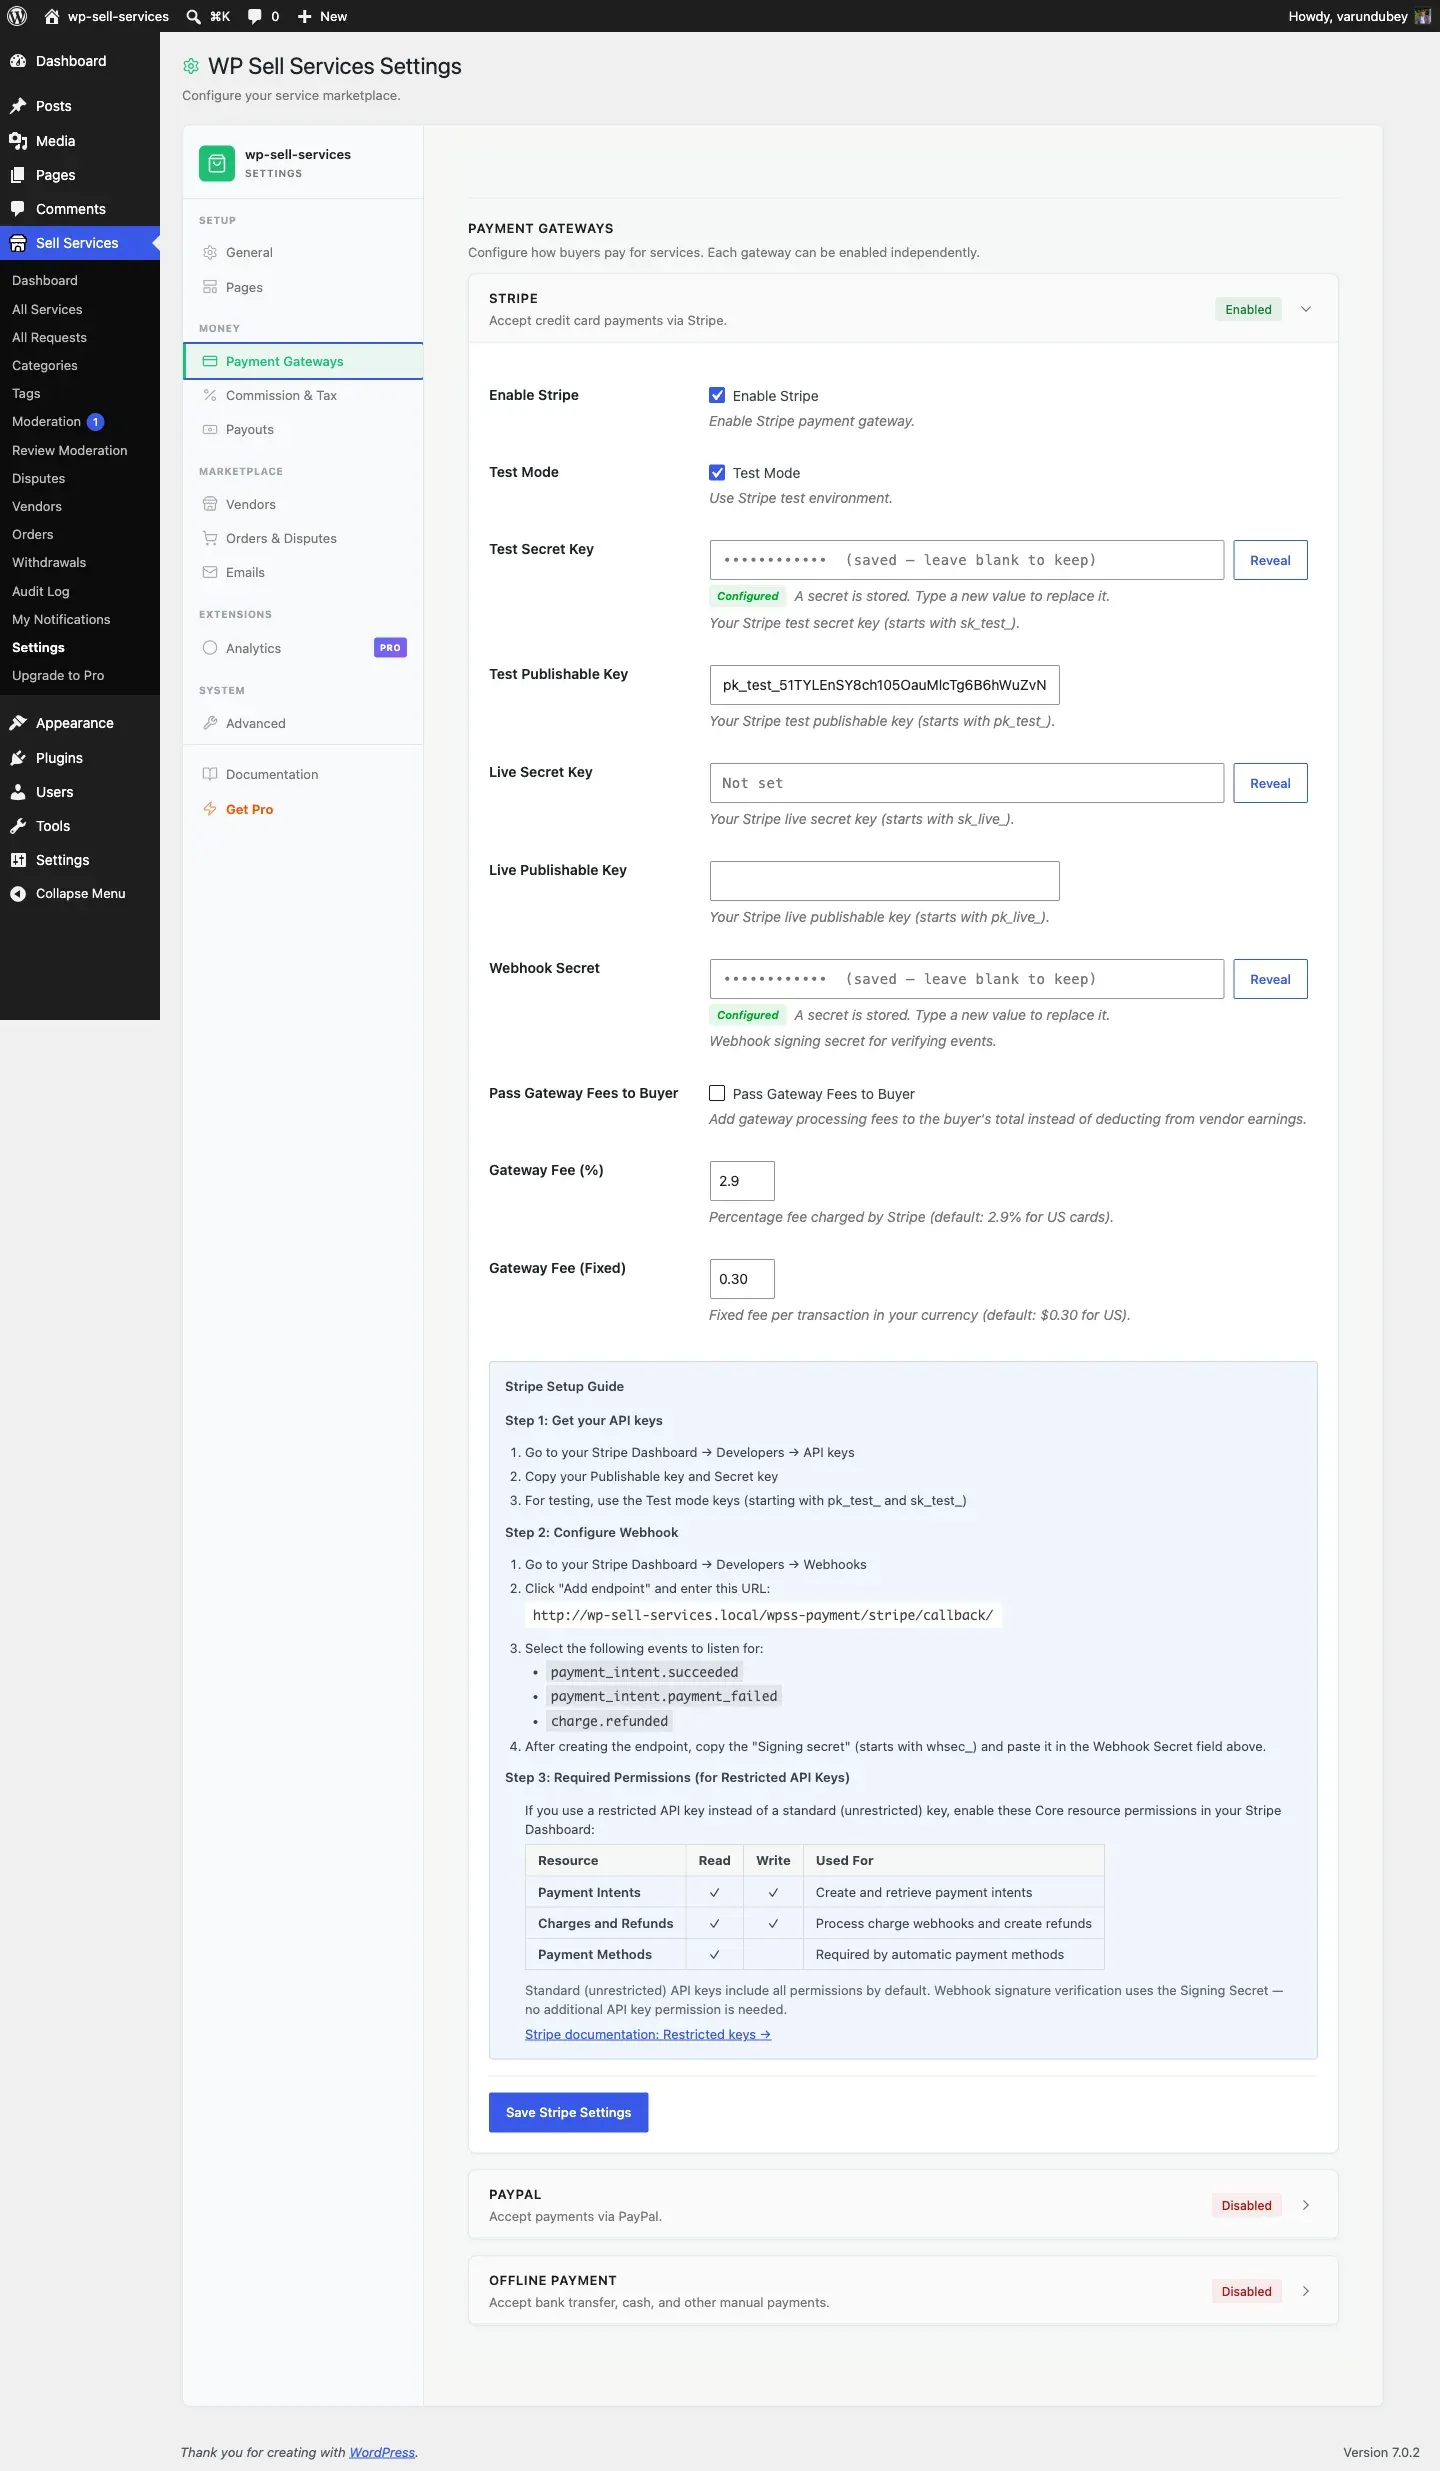
Section titled “Add Keys to Your Site”- Go to Sell Services > Settings > Payment Gateways
- Click the Stripe tab
- Check Enable Stripe
- Paste your Publishable Key and Secret Key
- Turn on Test Mode while you are setting up
- Set a display title like “Credit Card” (this is what buyers see)
- Click Save Changes
Set Up Webhooks
Section titled “Set Up Webhooks”Webhooks let Stripe tell your site when a payment succeeds or fails.
- In your Stripe Dashboard, go to Developers > Webhooks
- Click Add endpoint
- Paste your webhook URL:
https://yoursite.com/wpss-payment/stripe/callback - Select these events:
payment_intent.succeeded,payment_intent.payment_failed,charge.refunded - Click Add endpoint
- Copy the Signing secret that appears
- Paste it into Sell Services > Settings > Payment Gateways
- Click Save Changes
Sharing One Stripe Account Between Sites
Section titled “Sharing One Stripe Account Between Sites”Stripe sends every payment event on an account to every site connected to it. If your live site, a staging copy, or a second store all use the same Stripe account, each of them hears about the others’ payments.
Since 1.8.0 each site acts only on payments it created itself. Every payment carries the address of the site that started it, and a site ignores a payment that names a different address. A payment made on your staging copy cannot mark an order paid, or trigger a refund, on your live site.
What this means for you:
- You can safely share one Stripe account between a live site and its staging copy.
- If you move the site to a new domain, payments started on the old address are no longer recognised by webhooks, so let open checkouts finish first. Switching
httptohttpson the same domain changes nothing. - All sites sharing the account should run 1.8.0 or later. A site on an older version still reacts to payments from the others.
How Checkout Works with Stripe
Section titled “How Checkout Works with Stripe”When a buyer chooses to pay by card:
- Secure card fields appear right on your checkout page
- Stripe validates the card details in real time
- If 3D Secure authentication is needed, a verification popup appears
- Payment processes securely – card data never touches your server
- Order is created instantly on success
- Buyer sees an order confirmation page
Testing Before Going Live
Section titled “Testing Before Going Live”Use Stripe’s test card numbers to try out checkout without charging real money:
| Card Number | What Happens |
|---|---|
| 4242 4242 4242 4242 | Payment succeeds |
| 4000 0025 0000 3155 | 3D Secure verification required |
| 4000 0000 0000 9995 | Declined (insufficient funds) |
Use any future expiry date and any 3-digit CVC. When everything works, switch to live keys and turn off Test Mode.
3D Secure and Strong Customer Authentication
Section titled “3D Secure and Strong Customer Authentication”Stripe automatically handles 3D Secure (SCA), which is required for European transactions. No extra setup from you – buyers see a quick verification step when their bank requires it.
Supported Payment Methods
Section titled “Supported Payment Methods”Cards: Visa, Mastercard, American Express, Discover, Diners Club, JCB
Digital wallets: Apple Pay shows automatically on Safari/iOS, and Google Pay shows on Chrome/Android. No additional configuration needed.
Supported Currencies
Section titled “Supported Currencies”Stripe supports 135+ currencies. Your marketplace currency is set in Settings > General. Stripe will process payments in whatever currency you configure.
Stripe Connect for Direct Vendor Payments [PRO]
Section titled “Stripe Connect for Direct Vendor Payments [PRO]”With WP Sell Services Pro, you can enable Stripe Connect so payments go directly to each vendor’s Stripe account, with your platform commission deducted automatically. This means funds reach vendors faster and you avoid handling payouts manually.
Refunds
Section titled “Refunds”To refund an order:
- Go to Sell Services > Orders and open the order
- Click Refund
- Choose full or partial refund
- Click Process Refund
Refunds appear in the buyer’s account within 5-10 business days. Stripe refunds the percentage fee but keeps the fixed fee (typically $0.30 per transaction).
Automatic Refund When an Order Cannot Be Created
Section titled “Automatic Refund When an Order Cannot Be Created”Occasionally a buyer is charged but the order cannot be created: the vendor paused
or deleted the service while the buyer was paying, or the price changed. The
charge is then refunded automatically, whether the buyer’s browser or Stripe’s
webhook reports the payment. If Stripe says the charge was already refunded, that
counts as done. Only when the refund itself fails is an error written to the log
(CRITICAL: Stripe charge ... Manual intervention required) and Stripe asked to
try again.
Transaction Fees
Section titled “Transaction Fees”Stripe charges per transaction (rates vary by country):
- Domestic cards (US): 2.9% + $0.30
- International cards: 3.9% + $0.30
For example, on a $100 service, Stripe keeps about $3.20 and you receive $96.80.
Security
Section titled “Security”Your site never stores or processes card data. Stripe handles all PCI compliance through their secure payment form. Card details go directly to Stripe’s servers, and your site only receives a secure payment token.
Troubleshooting
Section titled “Troubleshooting”| Problem | Solution |
|---|---|
| “Payment failed” on every attempt | Check that your keys match the mode (test keys for test mode, live keys for live mode) |
| Webhooks not received | Verify the webhook URL is exactly https://yoursite.com/wpss-payment/stripe/callback (no trailing parameters). Check your site uses HTTPS. |
| 3D Secure popup not appearing | Ensure your site is not blocking iframes. Some security plugins block the Stripe verification popup. |
| “No such payment_intent” error | You are mixing test and live keys. Ensure both publishable and secret keys are from the same mode. |
| Webhook signature verification failed | The webhook signing secret must match the specific endpoint. Re-copy it from Stripe Dashboard > Developers > Webhooks > your endpoint > Signing secret. |
| Apple Pay / Google Pay not showing | These require HTTPS and domain verification in Stripe Dashboard > Settings > Payment methods. |
| Test payments are refunded within seconds | Another site on the same Stripe account is running a version older than 1.8.0 and is refunding payments it did not make. Update that site, or give it its own Stripe account. |
| A payment succeeded in Stripe but the site ignores the webhook | The payment was started on a different site address. See “Sharing One Stripe Account Between Sites” above. |
Related Docs
Section titled “Related Docs”- Standalone Mode – Required for Stripe direct integration
- Other Payment Gateways – PayPal, Razorpay, offline
- Currency and Tax – Financial settings