BuddyX and BuddyXPro, both the themes, are translation ready.
They have been set up in a way that the string of themes can be translated easily with the Loco Translate plugin.
Switch Language
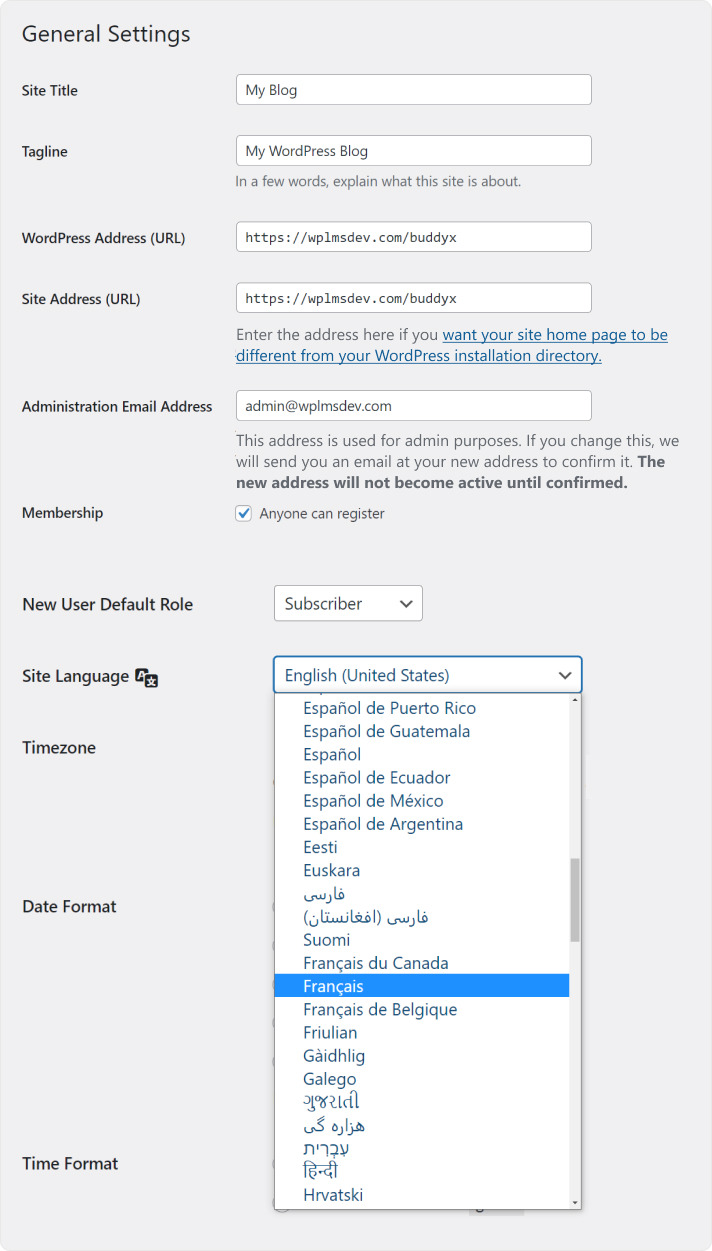
Before translating the theme to your desired language, It’s necessary to switch your website to that language. For this, head to the Settings > General admin screen and scroll to the bottom. You should see a dropdown list with the label “Site Language.” Changing this will set a new default language for all site visitors. Try it, and you should see something like this:

Continuing the theme of our example, we’re going to set the language to French, choose the language, and save changes.
If you don’t see your language in the dropdown list, you may have to install the core language packs manually.
You can set your site back to English now if you like. We’ll be switching to French later on, to check whether our custom translations are working or not.
Folder Setup
Before translating, make sure the following folder exists on your site and is writeable by the webserver:
wp-content/languages/loco/themes
If you have automatic updates enabled, then the "wp-content/languages" folder probably exists already. The "loco" Subfolder is there to protect your custom translations from automatic translation updates. This is critical if you want to avoid your files being deleted behind your back.
Loco Translate also lets you save translations inside the theme’s own folder, but this is provided for theme developers only. Files inside the theme folder will get deleted by WordPress updates, so don’t save anything in there unless you know what you’re doing.
Find BuddyX Pro in Transklation Dashboard
Click the admin menu item that says “Loco Translate” and select the “Themes” subsection.
This will take you to a list of all available themes in your WordPress. You should see “BuddyX pro” in the list regardless of whether it’s your active theme. Click it, and you should see the following screen:
Add a new Language
Above the language list (which may be empty), you should see a button that says “New language” with an add icon. To start translating the theme into another language, click this button, and you’ll be taken to a new screen where you can choose the language you want.
You should see a location marked as “Custom.” You should select this, so your new translations are safe from automatic updates.
With the language and folder location selected, click the “Start translating” button, and you’ll be taken to the editor screen to translate the theme.
Translate the Strings
Once on the editor screen, you’ll see all the strings the theme has defined in its template file. Untranslated strings are shown in bold blue. To start with, they will all be untranslated.
The basics of the editor should be fairly intuitive. Select the English string at the top and enter your translation in the pane at the bottom. You can ignore most of the editor buttons for now. We’re just going to enter a translation and save it.
For our example, we’ve picked out the phrase ” comment.” Using the text filter at the top of the editor, we can find this phrase quickly and select it in the list. Then we enter the text “commenter” into the bottom pane as our translation.
The string at the top now shows a star icon to indicate that our changes are not yet saved.
Continue to translate as much as you like, and when you’re ready, click the Save icon in the editor toolbar. Congratulations, you’ve saved your first WordPress translation.
